Code Editimage Update Webhook – Creative Design Automation | Complete n8n Webhook Guide (Intermediate)
This article provides a complete, practical walkthrough of the Code Editimage Update Webhook n8n agent. It connects HTTP Request, Webhook across approximately 1 node(s). Expect a Intermediate setup in 15-45 minutes. One‑time purchase: €29.
What This Agent Does
This agent orchestrates a reliable automation between HTTP Request, Webhook, handling triggers, data enrichment, and delivery with guardrails for errors and rate limits.
It streamlines multi‑step processes that would otherwise require manual exports, spreadsheet cleanup, and repeated API requests. By centralizing logic in n8n, it reduces context switching, lowers error rates, and ensures consistent results across teams.
Typical outcomes include faster lead handoffs, automated notifications, accurate data synchronization, and better visibility via execution logs and optional Slack/Email alerts.
How It Works
The workflow uses standard n8n building blocks like Webhook or Schedule triggers, HTTP Request for API calls, and control nodes (IF, Merge, Set) to validate inputs, branch on conditions, and format outputs. Retries and timeouts improve resilience, while credentials keep secrets safe.
Third‑Party Integrations
- HTTP Request
- Webhook
Import and Use in n8n
- Open n8n and create a new workflow or collection.
- Choose Import from File or Paste JSON.
- Paste the JSON below, then click Import.
-
Show n8n JSON
Title: Prompt-Based Object Detection with Gemini 2.0 in n8n: Automatically Detect and Highlight Objects in Images Meta Description: Learn how to use Google Gemini 2.0's advanced object detection capabilities in n8n to create a no-code workflow that detects and highlights objects like rabbits in an image using bounding boxes. Keywords: n8n, object detection, Gemini 2.0, Google Gemini API, multimodal AI, image processing, bounding boxes, machine learning, prompt-based detection, edit image, automation workflow, no-code AI, computer vision, image analysis, Google PaLM API Third-Party APIs Used: - Google Gemini API (Gemini 2.0 via googlePalmApi credential) Article: Prompt-Based Object Detection with Gemini 2.0 in n8n n8n, a powerful open-source workflow automation tool, allows users to orchestrate complex processes across APIs, files, databases, and more. With the rise of AI-powered image recognition and the emergence of prompt-to-image interactions, we're now able to blend visual information processing directly into n8n workflows using tools like Google’s Gemini 2.0 model. In this tutorial, we'll explore a real-world use case: detecting all rabbits in a photo using Gemini 2.0's object detection capabilities. We'll also learn how to dynamically draw bounding boxes around the detected subjects. The entire process is achieved using no-code/low-code tools inside n8n. Overview of the Workflow This n8n workflow is designed to demonstrate a prompt-based object detection pipeline using Gemini 2.0, Google’s multimodal AI model. The workflow proceeds through the following four steps: 1. Retrieve a test image 2. Prompt Google Gemini 2.0 to detect rabbits in the image 3. Scale the bounding box coordinate outputs 4. Draw bounding boxes directly on the image Let’s break down how each step works. Step 1: Retrieve and Analyze the Image We start the workflow with a Manual Trigger node, which allows us to test our automation on demand. Immediately after, an HTTP Request node titled “Get Test Image” downloads a JPG image of a petting zoo, which contains several animals, including rabbits. This publicly accessible image URL serves as our testing ground. The image then passes through the “Get Image Info” node. This Edit Image node isn't used to alter the image but to extract crucial metadata—specifically the width and height. These dimensions are necessary for scaling the normalized coordinates that Gemini returns later on. Step 2: Detect Objects Using Google Gemini 2.0 With our image ready, we send it to the Gemini 2.0 API via an HTTP Request node configured with POST. We provide a prompt: “I want to see all bounding boxes of rabbits in this image.” Along with the prompt, we submit the base64-encoded JPEG data inline using the "inline_data" field. The Gemini model, configured to return a structured JSON response, analyzes the image and returns a list of bounding box coordinates (box_2d) for any rabbits it detects. This is majorly exciting because Gemini supports prompt-based object recognition. That means we can swap the word “rabbits” for just about anything appropriate—like “cars,” “adults with children,” or “misplaced items”—without needing to retrain a new vision model. Step 3: Scale Coordinates to the Original Image Size Gemini returns bounding box coordinates normalized to a 0–1000 scale. However, we need absolute pixel values to plot these points accurately on the original image. A Set node titled “Get Variables” extracts key contextual information: the raw coordinates, width, and height of the image. Next, a Code node titled "Scale Normalised Coords" runs a short JavaScript script to scale each X and Y value according to the actual image dimensions. This step ensures our coordinates map correctly over the image. Step 4: Draw Bounding Boxes on the Image The final visual step uses the built-in Edit Image node—this time performing the “draw” operation. We use the scaled coordinates to draw up to six bounding boxes (you could scale more dynamically if needed) over the identified rabbits. Each box is given a semi-transparent fuchsia color to highlight the areas of interest clearly. The result? A new version of the image with bounding boxes displayed where Gemini found rabbits. You can view example outputs via this image: 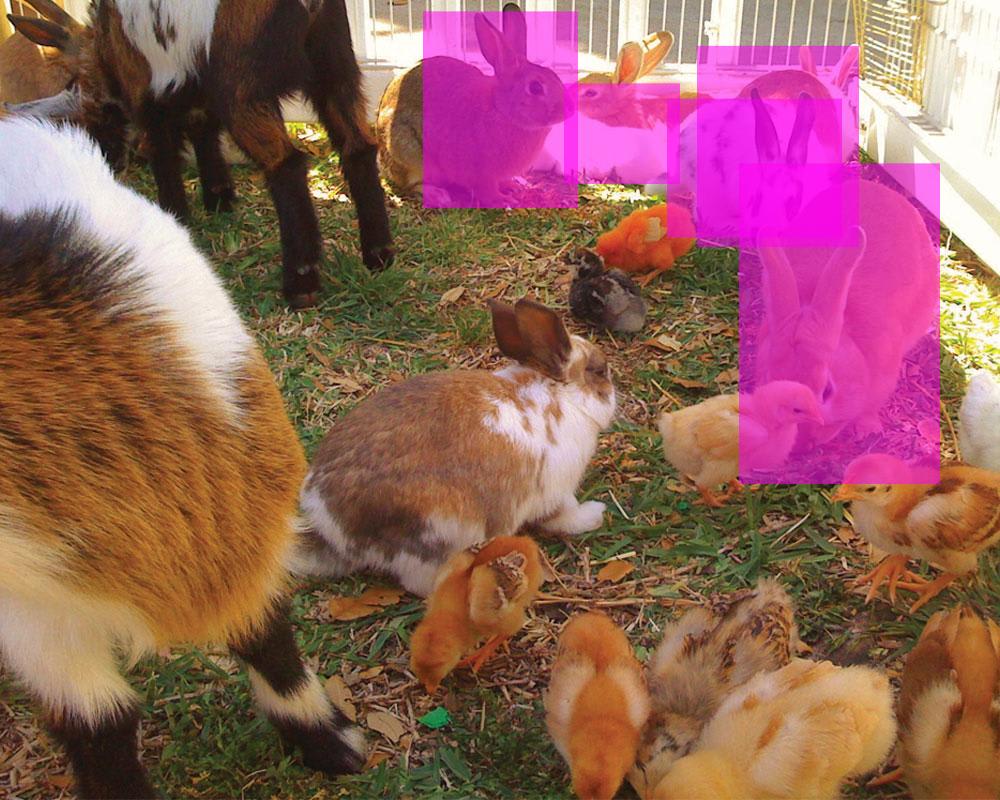 Applications and Use Cases This workflow doesn’t just detect bunnies—it introduces a whole new class of use cases: - Contextual visual search (e.g., “kids riding bicycles,” “smiling faces only”) - Real-time monitoring in security systems - Automated quality control on production lines - Smart sorting of photo databases With prompt-based detection, the possibilities are endless—and Gemini can grow smarter with more refined prompts. Why Not Use the Basic LLM Node? At the time of writing, n8n’s Basic LLM node doesn’t yet support Gemini 2.0 as a multimodal model. That’s why this workflow uses a direct HTTP Request to interact with the Google Gemini endpoint. But that route also gives us greater control over response schema and processing logic. Final Thoughts This n8n automation proves just how powerful multimodal AI and workflow automation can be when combined thoughtfully. By pairing Google’s Gemini 2.0 prompt-based object detection with the low-code flexibility of n8n, we've built an image-processing pipeline that’s imaginative, adaptable, and automation-ready. Want to try it yourself? You can copy the full workflow and give it a spin by simply swapping out the image and prompt to fit your own use case. For help and inspiration, check out the n8n Discord or Community Forum. Happy hacking! - Set credentials for each API node (keys, OAuth) in Credentials.
- Run a test via Execute Workflow. Inspect Run Data, then adjust parameters.
- Enable the workflow to run on schedule, webhook, or triggers as configured.
Tips: keep secrets in credentials, add retries and timeouts on HTTP nodes, implement error notifications, and paginate large API fetches.
Validation: use IF/Code nodes to sanitize inputs and guard against empty payloads.
Why Automate This with AI Agents
AI‑assisted automations offload repetitive, error‑prone tasks to a predictable workflow. Instead of manual copy‑paste and ad‑hoc scripts, your team gets a governed pipeline with versioned state, auditability, and observable runs.
n8n’s node graph makes data flow transparent while AI‑powered enrichment (classification, extraction, summarization) boosts throughput and consistency. Teams reclaim time, reduce operational costs, and standardize best practices without sacrificing flexibility.
Compared to one‑off integrations, an AI agent is easier to extend: swap APIs, add filters, or bolt on notifications without rewriting everything. You get reliability, control, and a faster path from idea to production.
Best Practices
- Credentials: restrict scopes and rotate tokens regularly.
- Resilience: configure retries, timeouts, and backoff for API nodes.
- Data Quality: validate inputs; normalize fields early to reduce downstream branching.
- Performance: batch records and paginate for large datasets.
- Observability: add failure alerts (Email/Slack) and persistent logs for auditing.
- Security: avoid sensitive data in logs; use environment variables and n8n credentials.
FAQs
Can I swap integrations later? Yes. Replace or add nodes and re‑map fields without rebuilding the whole flow.
How do I monitor failures? Use Execution logs and add notifications on the Error Trigger path.
Does it scale? Use queues, batching, and sub‑workflows to split responsibilities and control load.
Is my data safe? Keep secrets in Credentials, restrict token scopes, and review access logs.